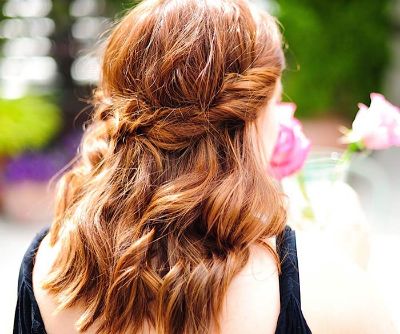
Fall 2015 Couture beauty seemed to be a little bit more accessible this year. Dewy, glowing skin reigned supreme, while hair was simply parted down the center, keeping things sleek and simple. A show that really stood out was Valentino. Soft, romantic, and fairytale-esque, models were sent down the runway with barely there makeup that glistened with just the right amount of shine. Even better was the hair. The girls had luscious, center-parted locks lightly curled and adorned with a gold headpiece inspired by the Roman Empire. The half-up half-down look only got more interesting in the back, as the ends were brilliantly done in a braid. Now this is something I can really get behind for summer soirees.
While most of us don’t have a luxe golden hair accessory at our disposal (although these are pretty great), we can most certainly go for the rest of the look. Perfect to rock as you work the summer social circuit, the Valentino look can be your new signature style. Here’s how to make this oh-so-chic couture hair style your own:
Step 1: Protect and add shine
To achieve this look, you must properly prep. It’s all about moisture, heat protection, and long-lasting shine. After shampooing and conditioning, apply a cream before applying heat. Part your hair down the middle and blow dry as usual.
Step 2: Make waves
Once your hair is fully dry, get out your curling iron or wand. Create un-done beachy curls by taking small sections of the hair and gently adding heat. Focus on making the hair framing the face super curly. This will help you properly create the half-up half-down look. Also make sure the ends are left a little straight.
Step 3: Creating the sultry, un-done look
To make sure things stay in place, you need the help of a few rock star products. First you’ll need some kind of texturizing spray to preserve the sexy messiness of the waves. To prevent your curls from falling throughout the day, spray a light hairspray on your locks.
Step 4: Twist and pull back
Once your hair is nice and curly and perfectly prepped, start to pull the hair back. On either side of the face, take a section of hair near the ears and gently twist. Join the two strands in the back, using bobby pins to secure the hair in a straight across bar-like formation.
Step 5: Trying the optional braid
I skipped this, because my hair isn’t exactly Rapunzel status at the moment. But if your locks are long and you’re feeling adventurous, try going all out with a braid. Divide the ends of the hair into three even sections, braid, and secure with a clear hair tie. You can pick these up at any drugstore.
Source: www.shesintheglow.com


